Snowflake
This guide explains how to create a read-only service account (metadata access only) for Revefi on Snowflake.
Step 1: Create role, user, warehouse and grant account permissions
As a super user, execute the following SQL commands to create a read-only role, a user assigned to that role, and a warehouse for that role.
Please note:
Make sure to generate a secure password for the field called <strong_password_for_revefi_read_only_access> and store it securely — you'll save it into Revefi later.
Revefi will use an XS warehouse by default. This setting can be modified later if necessary.
We recommend using Snowflake's worksheet interface to run the snippet. Please copy the code and make any necessary modifications before running it.
-- Use a role with sufficient privileges to grant the below permissions
USE ROLE ACCOUNTADMIN;

-- Configuration
set revefi_username='REVEFI_USER';
set revefi_password='<strong_password_for_revefi_read_only_access>';
set revefi_warehouse_size='XSMALL';
set revefi_warehouse_name='REVEFI_WH';
set revefi_role_name='REVEFI_ROLE';

-- Create warehouse for Revefi's monitoring workload
CREATE WAREHOUSE IF NOT EXISTS identifier($revefi_warehouse_name) WAREHOUSE_SIZE=$revefi_warehouse_size INITIALLY_SUSPENDED=TRUE AUTO_SUSPEND = 5 AUTO_RESUME = TRUE MAX_CONCURRENCY_LEVEL = 32 STATEMENT_TIMEOUT_IN_SECONDS = 1200 STATEMENT_QUEUED_TIMEOUT_IN_SECONDS = 1200;

-- Create the role Revefi will use
CREATE ROLE IF NOT EXISTS identifier($revefi_role_name);

-- Create Revefi's user and grant access to role
CREATE USER IF NOT EXISTS identifier($revefi_username) PASSWORD=$revefi_password  DEFAULT_ROLE=$revefi_role_name;
GRANT ROLE identifier($revefi_role_name) TO USER identifier($revefi_username);

-- Grant permissions to use the new warehouse
-- OPERATE allows Revefi to start and stop the warehouse.
GRANT OPERATE, USAGE, MONITOR ON WAREHOUSE identifier($revefi_warehouse_name) TO ROLE identifier($revefi_role_name);

-- Grant privileges to allow access to query history and other account level metadata
GRANT IMPORTED PRIVILEGES ON DATABASE "SNOWFLAKE" TO ROLE identifier($revefi_role_name);
Step 2: Provide metadata access to each database you want to monitor
Please note:
Replace <db_to_monitor> with the actual name of the database you want to monitor
-- Use a role with sufficient privileges to grant the below permissions
USE ROLE ACCOUNTADMIN;

-- Configuration
set revefi_role_name='REVEFI_ROLE';
-- NOTE: If your database name has special characters, please double quote the name:
-- https://docs.snowflake.com/en/sql-reference/identifiers-syntax#double-quoted-identifiers
-- E.g. set database_name = '"prod-orders"';
set database_name = '<db_to_monitor>';

-- Grant permission to run the USE command on database and schemas
GRANT USAGE on database identifier($database_name) to role identifier($revefi_role_name);
GRANT USAGE ON ALL SCHEMAS IN DATABASE identifier($database_name) TO ROLE identifier($revefi_role_name);
GRANT USAGE ON FUTURE SCHEMAS IN DATABASE identifier($database_name) TO ROLE identifier($revefi_role_name);

-- Grant permission to view tables and their schemas
GRANT REFERENCES ON ALL TABLES IN DATABASE identifier($database_name) TO ROLE identifier($revefi_role_name);
GRANT REFERENCES ON FUTURE TABLES IN DATABASE identifier($database_name) TO ROLE identifier($revefi_role_name);

USE DATABASE identifier($database_name);
-- By default the below procedure is created in the PUBLIC schema of the specified database.
-- If a PUBLIC schema does not exist, please un-comment the below line and specify any schema name of your choice.
-- USE SCHEMA <schema_name>;

-- Snowflake allows granting privileges either for a database or a schema. However, schema privileges take precedence.
-- This has an unfortunate side-effect for future grants, explained here: https://community.snowflake.com/s/article/DB-Level-Future-Grants-Overridden-by-Schema-Level-Future-Grants
-- Any schema level FUTURE grants to one role, will cause Snowflake to dis-regard all db level FUTURE grants to other roles.
-- This below stored procedure checks whether any FUTURE grants exists for a schema. If they do, it grants Revefi FUTURE grants for that schema.
-- If no FUTURE grants exist for any schema, the below stored procedure is a no-op.
CREATE OR REPLACE PROCEDURE GRANT_SCHEMA_REFERENCES_TO_REVEFI()
  RETURNS VARCHAR
  LANGUAGE javascript
  EXECUTE AS CALLER
  AS
  $$
  // Check for existing future grants to each schema. If they exist, grant future privileges to Revefi for that schema.
  var schemas_to_grant = snowflake.createStatement({ sqlText:`select * from information_schema.SCHEMATA where SCHEMA_NAME <> 'INFORMATION_SCHEMA'`}).execute();
  var discovered_schemas = "";
  var granted_schemas = "";
  while(schemas_to_grant.next()) {
    table_schema = schemas_to_grant.getColumnValue("SCHEMA_NAME");
    discovered_schemas += table_schema + ","
    var show_future_grants_result = snowflake.createStatement({sqlText: `SHOW FUTURE GRANTS IN SCHEMA "${table_schema}"`}).execute();
    if (show_future_grants_result.getRowCount() > 0) {
        snowflake.createStatement({ sqlText:`GRANT REFERENCES ON ALL TABLES IN SCHEMA "${table_schema}" TO ROLE identifier($revefi_role_name)`}).execute();
        snowflake.createStatement({ sqlText:`GRANT REFERENCES ON FUTURE TABLES IN SCHEMA "${table_schema}" TO ROLE identifier($revefi_role_name)`}).execute();

        granted_schemas += table_schema + ","
    }
  }

  return `Discovered schemas: [${discovered_schemas}]. Granted references for schemas: [${granted_schemas}] (if blank, no schema grants were needed)`;
  $$;

CALL GRANT_SCHEMA_REFERENCES_TO_REVEFI();
Additional security considerations
-
Allowlist Revefi IP addresses (if applicable)
Add Revefi IP addresses (44.225.56.55, 44.227.173.42, 52.10.141.35) to your Snowflake account if Snowflake is configured to only allow connections from an "allowed list" of IP addresses. -
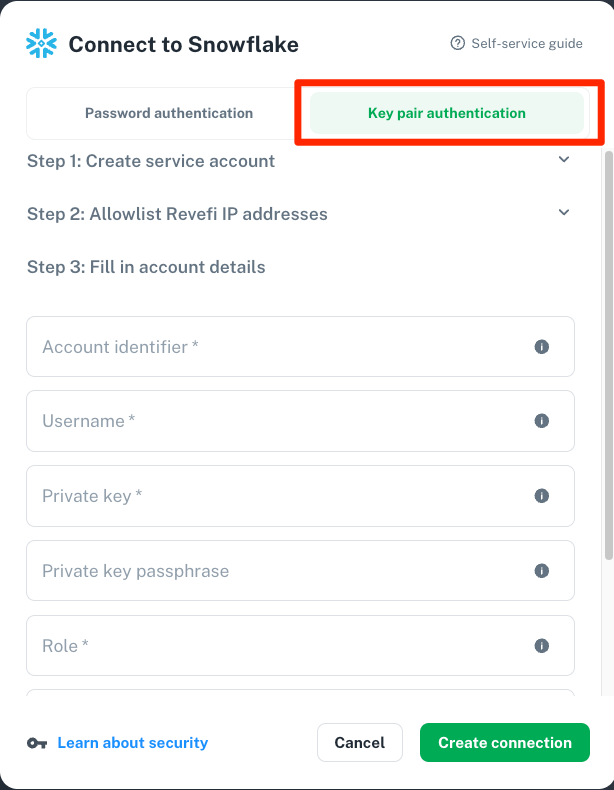
Snowflake supports using key pair authentication for enhanced authentication security as an alternative to basic authentication (i.e. username and password). If you enable that for the user you use for Revefi monitoring, then follow the "Key pair authentication" path in the Connect to Snowflake page in Revefi. If you use encrypted private key, then make sure to fill in the Private key passphrase, otherwise leave that field blank for unencrypted private key.
FAQ
- The
CREATE OR REPLACE PROCEDURE GRANT_SCHEMA_REFERENCES_TO_REVEFI()statement creates the procedure under the chosen database's PUBLIC schema. If the database does not have a PUBLIC schema, you may see an error. In this case, simply select another schema in the database (either with theUSE SCHEMAcommand or from the Snowflake Worksheet UI) and re-run the script. - The
CALL GRANT_SCHEMA_REFERENCES_TO_REVEFI();statement requires a warehouse to be selected in the Snowflake Worksheet UI. This can be any warehouse that you have access to - not restricted to the warehouse created earlier. - In Step 2, for database names with special characters, please double quote the name. For e.g.
set database_name = '"prod-orders"'.
Updated 5 months ago
Once you have run this Snowflake script, go to the Connections page in Revefi on the left nav, and click Connect on the Snowflake box to enter the credentials for the Revefi user created above! Once that's done, optionally set up to receive your alerts via Slack (default is your email).