Databricks
This guide explains how to onboard your Databricks account on to Revefi.
Step 1: Create a new Databricks service principal
Revefi connects to your Databricks via a service principal. You need to create a new service principal for Revefi with the right permissions and then generate oauth credentials.
Generate a new service principal for Revefi
-
Create a new service principal for Revefi at the account level Use the guide to create a service principal in your Databricks account and add it to your workspace. Ensure that the Service Principal has Databricks SQL access and Workspace access Entitlements. This step should be done in account console. Save the application id
-
Generate a secret for service principal
Use the guide to generate a client ID and secret for the service principal. This again needs to be done by an Account admins via the account console. From the User management tab, select the service principal, then go to the Credentials & secrets tab to do the same.
Step 2: Grant Unity Catalog data permission to the service principal
Run these SQL commands on each catalog that Revefi should have access to. This allows revefi to monitor tables in your worspace.
GRANT USE_CATALOG ON CATALOG <catalog_name> TO `<application_id>`;
GRANT USE_SCHEMA ON CATALOG <catalog_name> TO `<application_id>`;
GRANT SELECT ON CATALOG <catalog_name> TO `<application_id>`;
Revefi needs access to the system catalog. Note that access to system catalog can only be granted by a metastore admin. This is required for Revefi to read metdata from system tables.
GRANT USE_CATALOG ON CATALOG system TO `<application_id>`;
GRANT USE_SCHEMA ON CATALOG system TO `<application_id>`;
GRANT SELECT ON CATALOG system TO `<application_id>`;
Create a seperate catalog called revefi and grant the following permissions.
GRANT USE_CATALOG ON CATALOG revefi TO `<application_id>`;
GRANT USE_SCHEMA ON CATALOG revefi TO `<application_id>`;
GRANT CREATE_SCHEMA ON CATALOG revefi TO `<application_id>`;
GRANT CREATE_MATERIALIZED_VIEW ON CATALOG revefi TO `<application_id>`;
This catalog is used to create materialized views to speed up certain queries on system tables.
Step 3: Create a Databricks SQL Warehouse
Use the guide to create a new SQL Warehouse for Revefi(Serverless is preferred). Use the 'Permissions' button and give the new service principal 'Can use' permissions on this warehouse.
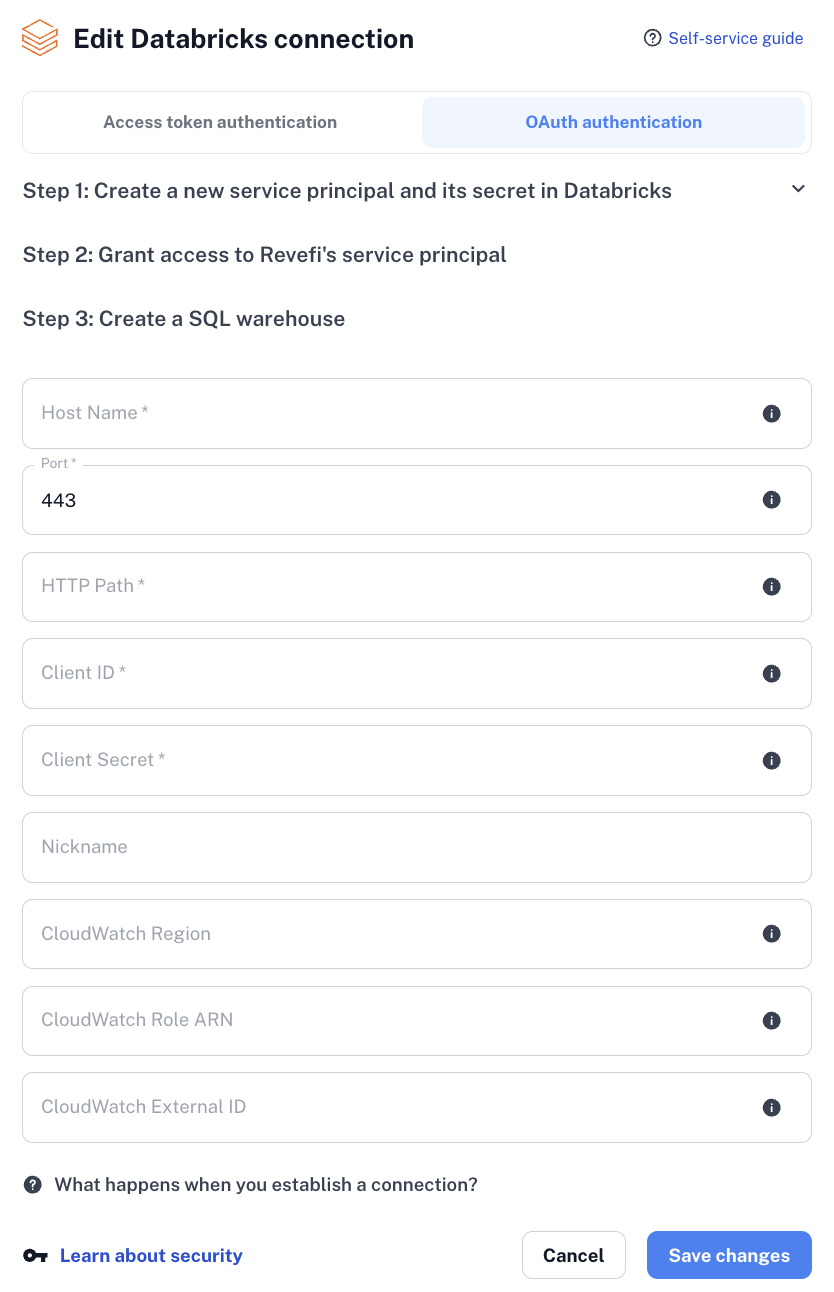
Step 4: Add Databricks as a connection in Revefi
Allowlist Revefi IP addresses (if applicable) Add Revefi IP addresses (
Finally now you can onboard your Databricks account on Revefi. On the connections page, click the 'Add connection' and select Databricks as the source. Then select Oauth Authentication at the top. The HostName, Port and HTTP Path fields come from the SQL Warehouse created in Step 3. The ClientID and secret comes from Step 1.
If you see any connection issues, that might be because of missing permissions. You can run the below databricks cli commands on your end to ensure all the permissions have been granted first
#!/bin/bash

databricks configure --token
databricks api post /api/2.0/sql/statements \
  --json '{
    "warehouse_id": <warehouse_id>,
    "statement": "SELECT * from system.compute.warehouses limit 1"
  }'
Step 5: Additional requirements for Job Optimization
Revefi can also optimize your Databricks jobs which requires additional setup.
- Grant CAN_MANAGE/CAN_VIEW permissions to the service principal on all jobs and all-purpose clusters. This can be done using Terraform or using the script below.
#!/bin/bash

# === CONFIGURATION ===
SERVICE_PRINCIPAL_ID="<service-principal-object-id>"  # e.g., "12345678-aaaa-bbbb-cccc-1234567890ab"

# === Fetch all jobs ===
echo "Fetching all job IDs..."
JOB_IDS=$(databricks jobs list --output JSON | jq -r '.[].job_id')

# === Loop through jobs and assign CAN_MANAGE or CAN_VIEW permission ===
for JOB_ID in $JOB_IDS; do
  echo "Updating permissions for job_id: $JOB_ID"

  databricks permissions jobs update --job-id "$JOB_ID" --json '{
    "access_control_list": [
      {
        "service_principal_name": "'$SERVICE_PRINCIPAL_ID'",
        "permission_level": "CAN_MANAGE"
      }
    ]
  }'

  echo "Permissions updated for job $JOB_ID"
done

echo "All job permissions updated successfully."

# === Fetch all clusters ===
echo "Fetching all-purpose cluster IDs..."
CLUSTERS=$(databricks clusters list --output JSON | jq -r '.[] | select(.cluster_source != "JOB") | .cluster_id')

# === Loop through clusters and assign CAN_MANAGE or CAN_VIEW permission ===
for CLUSTER_ID in $CLUSTERS; do
  echo "Updating permissions for cluster_id: $CLUSTER_ID"

  databricks permissions clusters update --cluster-id "$CLUSTER_ID" --json '{
    "access_control_list": [
      {
        "service_principal_name": "'$SERVICE_PRINCIPAL_ID'",
        "permission_level": "CAN_MANAGE"
      }
    ]
  }'

  echo "Permissions updated for cluster $CLUSTER_ID"
done
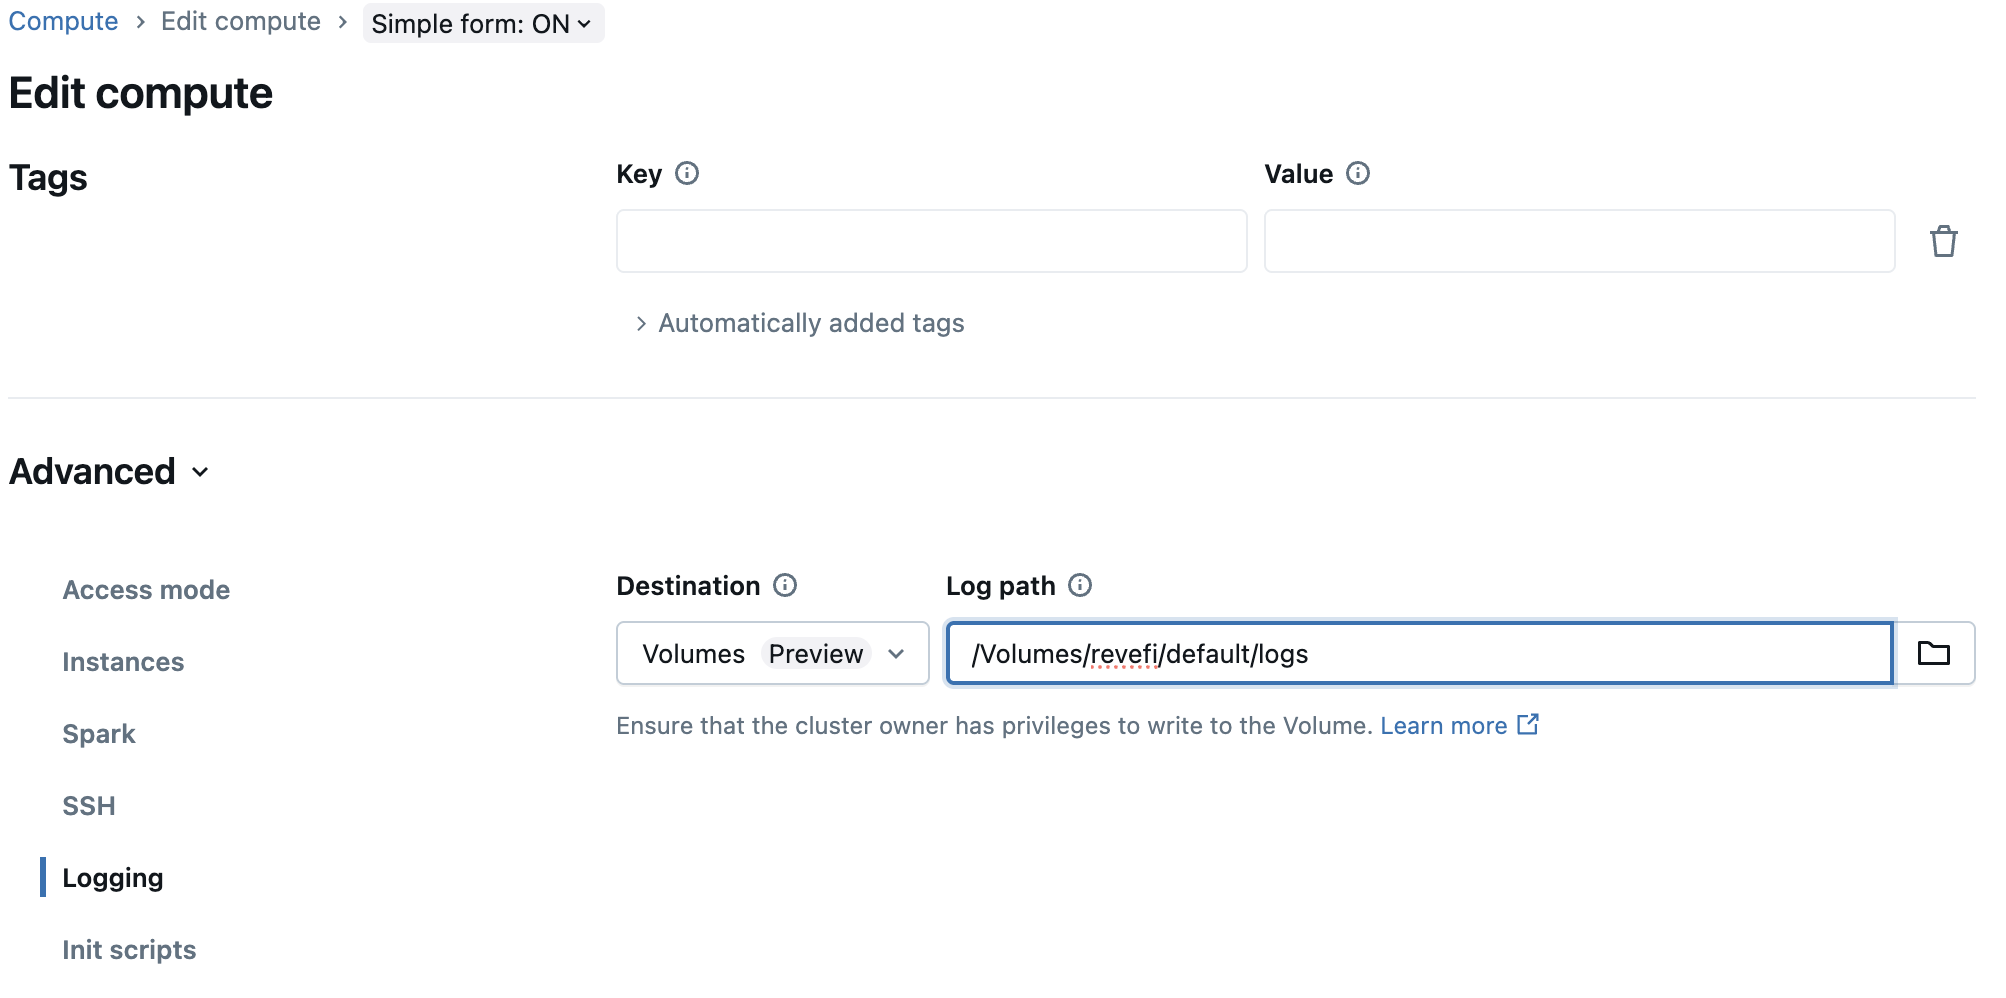
echo "All-purpose cluster permissions updated successfully."- Use guide to configure jobs to write their cluster logs to a volume at path
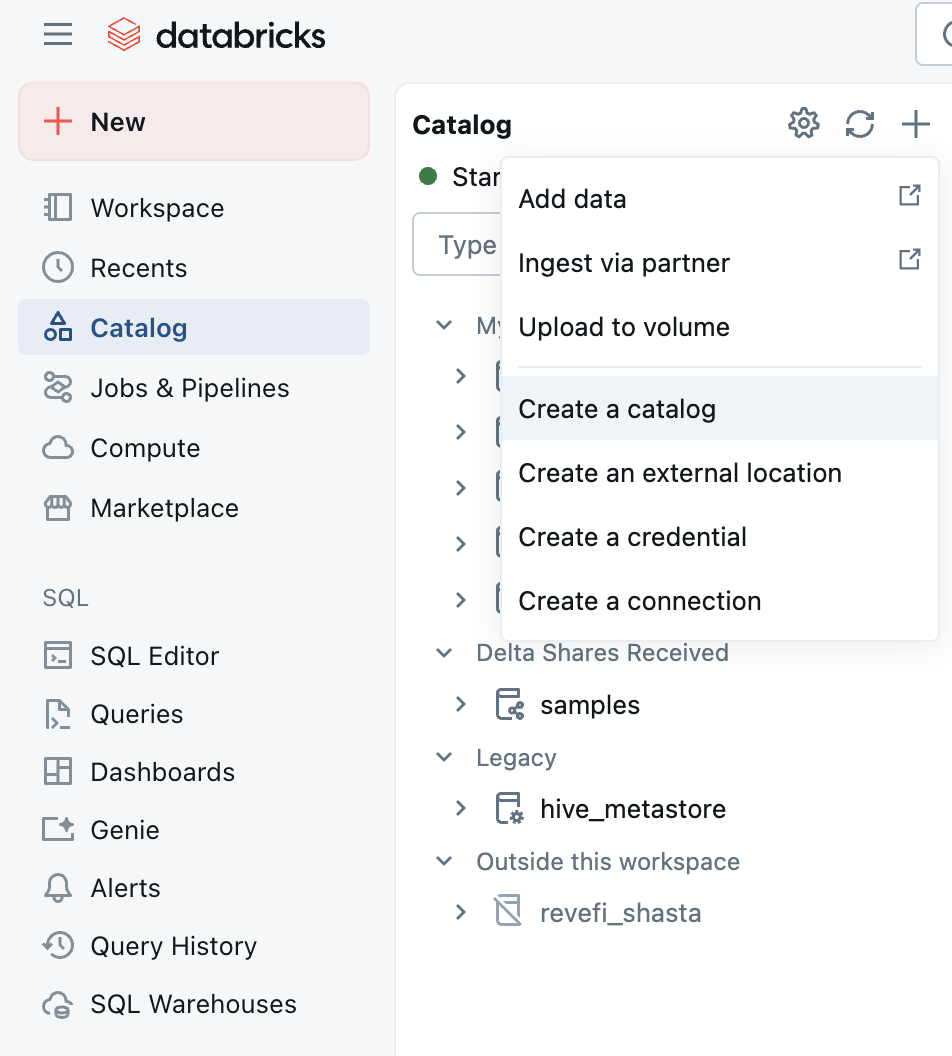
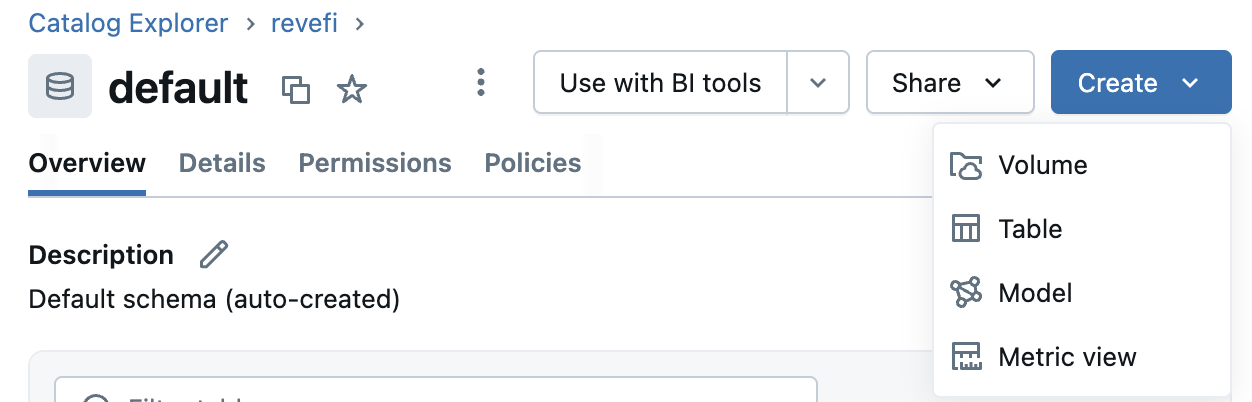
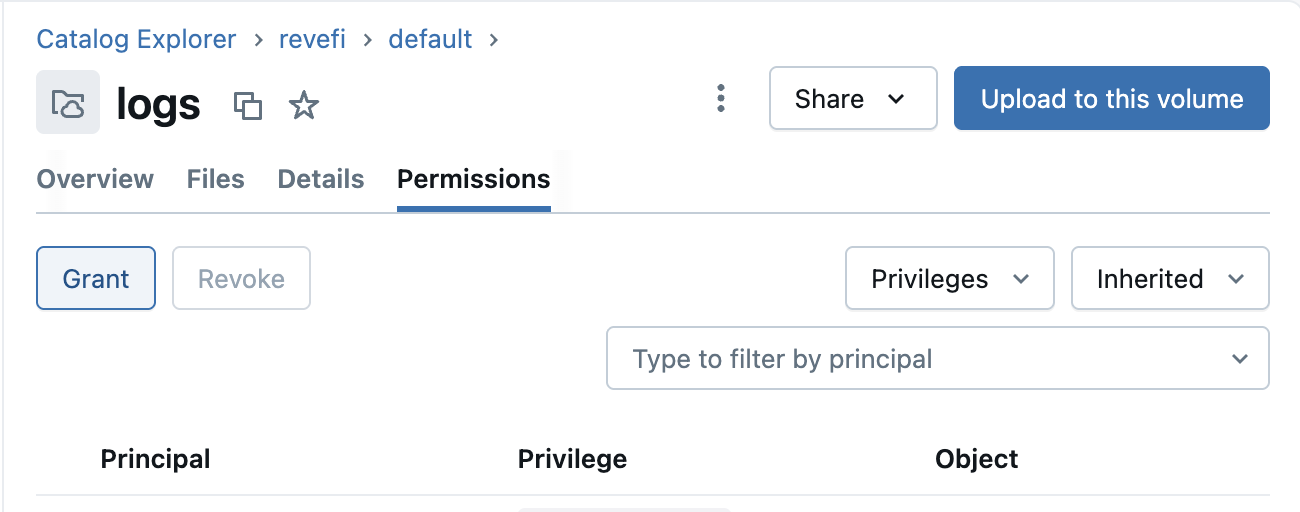
/Volumes/revefi/default/logs. This requires you to first create a new catalog from Unity Catalog explorer called revefi. Under revefi/default path create a new Volume called logs. Under the permission tab for the new volume, grant READ_VOLUME access to revefi's service principal. Also grant WRITE_VOLUME access to the owners of jobs/clusters whose logs are being enabled.
Then change the logging setting on clusters to write logs to /Volumes/revefi/default/logs path and save. Any changes in the settings will restart the cluster immediately, so it is best if this change is done when the cluster is in terminated state.
The logs should be avaible at /Volumes/revefi/default/logs/<clusterId> whenever the cluster starts next.
Step 6: Additional requirements for Cloudwatch Metrics
Revefi can also collect metrics from your AWS account powering end to end view of databricks jobs and clusters which requires additional setup in your AWS account.
- Create a new IAM Permissions Policy named
revefi-cloudwatch-metrics-reader-policyas below
{
  "Version": "2025-01-01",
  "Statement": [
    {
      "Sid": "VisualEditor0",
      "Effect": "Allow",
      "Action": [
        "cloudwatch:GetMetricData",
        "cloudwatch:GetMetricStatistics",
        "cloudwatch:ListMetrics"
      ],
      "Resource": "*"
    }
  ]
}- Create a new IAM Permissions Policy named
revefi-user-ec2-describe-policyas below
{
  "Version": "2025-01-01",
  "Statement": [
    {
      "Sid": "EC2Actions",
      "Effect": "Allow",
      "Action": [
        "ec2:DescribeInstances",
        "ec2:DescribeVolumes",
        "ec2:DescribeSpotPriceHistory"
      ],
      "Resource": [
        "*"
      ]
    }
  ]
}- Create an AWS IAM Role with custom trust policy Create a new AWS IAM role
revefi-reader-rolewith the "Custom trust policy" trust entity as below
{
  "Version": "2025-01-01",
  "Statement": [
    {
      "Effect": "Allow",
      "Principal": {
        "AWS": "arn:aws:iam::220294960462:root"
      },
      "Action": "sts:AssumeRole",
      "Condition": {
        "StringEquals": {
          "sts:ExternalId": "some-customer-generated-random-string"
        }
      }
    }
  ]
}- Attach the IAM Policies created in Step 1 and Step 2 to the IAM Role created in Step 3.
- Now that the role and policy are created, the following information will need to be shared with Revefi. There will be optional fields to provide this information when setting up (or editing) a Databricks connection in the Revefi app.
- Your AWS region (e.g., us-west-2)
- The ARN of role
revefi-reader-role - The external-id added to the role
revefi-reader-role
Step 7: Additional requirements for AWS Infra Cost Metrics
Revefi can get aws infra cost for your AWS account powering end to end cost observability for databricks jobs
- Create a new IAM Permissions Policy named
revefi-cost-metrics-reader-policyas below
{
  "Version": "2025-01-01",

  "Statement": [
    {
      "Sid": "VisualEditor0",
      "Effect": "Allow",
      "Action": [
        "ce:GetCostAndUsage"
      ],
      "Resource": "*"
    }
  ]
}- Attach the IAM Policy to the AWS IAM role
revefi-reader-role. - Activate Tags for Cost Allocation in your AWS account (this step can only be done by account billing admin)
- Go to the AWS Billing and Cost Management console.
- In the navigation pane, choose "Cost Allocation Tags".
- Activate the tags
JobId,ClusterId,ClusterName, andRunId.
Step 8: Additional requirements for DLT Pipeline Optimization
Revefi can also help optimize your Databricks DLT pipeline which requires additional permissions.
- Grant CAN_VIEW permissions to the service principal on all dlt pipeline. This can be done using Terraform or using the script below
#!/bin/bash

# === CONFIGURATION ===
SERVICE_PRINCIPAL_ID="<service-principal-object-id>"  # e.g., "12345678-aaaa-bbbb-cccc-1234567890ab"

# === Fetch all pipelines ===
echo "Fetching all pipeline IDs..."
PIPELINE_IDS=$(databricks pipelines list-pipelines --output JSON | jq -r '.[].pipeline_id')
for PIPELINE_ID in $PIPELINE_IDS; do
  echo "Updating permissions for pipeline_id: $PIPELINE_ID"
  databricks permissions update pipelines "$PIPELINE_ID" --json '{
    "access_control_list": [
      {
        "service_principal_name": "'$SERVICE_PRINCIPAL_ID'",
        "permission_level": "CAN_VIEW"
      }
    ]
  }'
  echo "Permissions updated for pipeline $PIPELINE_ID"
done

echo "All pipeline permissions updated successfully."
Frequently Asked Questions (FAQ)
Updated 3 months ago